Posts

Showing posts from August, 2012

Free Magnet from Shutterfly

Image
  Today is the LAST day  for this offer! Use the promo code below to get your free large magnet. All you pay is shipping, which was $3.99. Can't wait to get my magnet!   This would make a great Grandparents Day Gift. Hint, Hint...Grandparents Day is September 9, 2012  

Goodbye Fun Summer Colors

Image
I am heading to a weeding this weekend, so I have decided to go with a lighter nail color and perhaps a French manicure on my toes (that will be a game time decision). I can't tell you the last time I've had a French manicure. I've narrowed down my dress choices to either a navy blue or teal cocktail dress with a nude shoe.  I am currently wearing a bright pink on my toes by Essie called "Wife Goes On," it's one of my favorite. This Summer has been so much fun for me. I've branched out and experimented with colors I would have never imagined I'd wear, especially on my finger nails. As Summer comes to a close, I'll be putting most of these colors away and shifting to my darker Fall & Winter Colors. But before I retire them for the season, I thought I'd share with you all of the fun I had this Summer.     Going into this summer, I would have considered myself an Essie Girl and for the most part, I still am. As are started to experime

Sweet & Salty... Chocolate & Peanut Butter Chip Pretzel Cookies

Image
...One of my favorite combinations. These cookies are delicious. I made them last night and am so excited to deliver them today to my friend Michelle who just had her 2nd little boy. I am sure she could use some Chocolate and Peanut Butter Chip Pretzel Cookies. I found this recipe on Pinterest. It's from Sugar Cooking- http://sugarcooking.blogspot.com/2010/07/pretzel-cookies-with-chocolate-peanut.html  & they are just wonderful! Chocolate & Peanut Butter Chip Pretzel Cookies Makes 24 cookies Ingredients: 1 1/2 cups of all purpose flour 1/2 tsp. of salt 1/4 tsp. of baking soda 1/2 cup of butter at room temperature 1/2 cup of tightly packed light brown sugar 1/3 cup of granulated sugar 1 egg (beaten) 1 tsp vanilla extract 1 cup milk chocolate chips 1/2 cup peanut butter chips 1/2 cup broken up pretzel pieces Pretzel Salt or Sea Salt Directions:   Step 1. Sift together the flour, baking soda , and salt. Set aside. Step 2. In a mixer or large b

Painting Trick

Image
Let me start with a disclaimer, I am not a pro. I have painted many of walls in my days and come from a family of contractors and painters, but by no means do I claim to be a pro. Just wanted to share this quick little tip that I found at Martha Stewart.com -  http://www.marthastewart.com/275689/good-things-for-painting/@center/276988/painting-ideas-and-projects#/180400 . I used this a couple of weeks ago when painting the master bedroom. This is a project that I have been working on for some time now. Basically painting a little at a time when O would go down for a nap. Instead of pouring my paint directly into the paint pan, I lined the pan first with foil and then pour in my paint. When I was finished, I just threw the foil away and for the most part had a very clean paint pan. There was a little paint on the lip of the pan, but much easier to rinse then the entire pan. I encourage you to check out the link above before your next painting project. She lists a total of 9 pain

Cookie Monster Cookie Toss

Image
O loves Cookie Monster. He has this funny little voice he does and says, "cookie, nom, nom, nom" while pretending to munch and shove cookies in his mouth. It's the funniest thing ever. So naturally when I saw this on www.smilelikeyoumeanit.net . (he made this for her son's 2nd birthday party),  I knew I had to make one for O. Fast forward to today. Being under a Tropical Storm watch and looking to keep a 19 month old entertained will get any ones creative juices flowing... and that is when I remembered pinning the Cookie Monster cookie toss. What you will need: -box, I used a diaper box and thought it was the perfect size. -image of Cookie Monster, I found mine on google images . -laminating machine (optional), but if I wanted it to last, I needed to laminate it. -scissors -felt, for cookies -sewing machine or these would be simple enough to sew by hand -oatmeal, I used old fashioned oats -brown markers, to draw chocolate chips on  your cookie -tape, to

Re-purpose your pack & play

Image
This is another great discovery I made on Pinterest. This site, never disappoints. I stumbled upon this great idea to turn your pack and play into a ball pit! It was originally pinned by RookieMoms.com - http://www.rookiemoms.com/create-an-easy-ball-pit-at-home/  So much fun, so easy and somewhat inexpensive. What you need: -your pack & play ( go ahead, dig it out of the closet and dust it off) -plastic balls ( I bought a set of 150 balls at Target for $15) What you get: -an entertained and happy toddler                  

Adding Pinterest Gadgets to my blog!

Image
WOW! I think my eyes are for permanently crossed from reading HTML code. This was a first me. In order for me to add a Pin It button I had to edit the HTML code of my blog. It was actually pretty simple with the directions I found. It was very nerve racking in fear of screwing the code up. I started by backing up my blog template to my hard drive; this is something I should have done from the get go. To find the instructions I used, follow the links below. Adding Pinterest Pin It button (with counter) to blog post http://www.bloggersentral.com/2012/02/add-pinterest-pin-it-button-on-blogger.html How to add Pinterest follow button http://www.bloggersentral.com/2012/02/how-to-add-pinterest-follow-button.html This website has A LOT of great instruction, tutorials and articles.

Florida State Football Door Wreath

Image
I am very excited about this project. While I did not go to Florida State, I did marry a wonderful man who did. This was a fun and fairly simple project. It only took me a couple of days to complete while O was napping. I have included pictures and some instructions as well so you can make your very own Alma Mater wreath. This project was modified from a Pinterest Project pinned by Sassy Sanctuary- http://www.sassysanctuary.com/2010/09/halloween-rag-wreath.html What you'll need: -scissors -glue gun -ruler -chalk (to mark your fabric to cut) -2-3 yards of fabric (I used three different colors, but you can use more colors or patterns). This should allow for some left over fabric just in case -18"wire wreath -ribbon -foamie sheet for letters (optional) -wooden embellishments (optional) 1. First step is to gather all of your supplies. As I mentioned I completed this project in two days. My recommendation would be to cut all of your fabic first. You should cut fabric

O's Room Refresh

Image
It will be a year in October since we moved to this house. I am embarrassed to say that I never decorated O's room.  In our last house, we painted and of course had a theme for the nursery. One of the reason I never did anything in this house is because we weren't sure if he would stay in that bedroom when baby #2 came. Well it's almost been a year and there is no baby #2, yet. A few weeks ago, I was rocking Owen and thought to myself how boring his room was. Most of our time is spent downstairs and he probably doesn't even realize there is no theme to his room.I still felt bad. So I decided I was going to "refresh" his room. I went with Thomas the Train theme since he is really into this right now. Below are the pictures. My goal was not to spend a lot of money. That will come down the road when he moves into a "big boy bed."So from left to right, (picture is a little skewed), I had this frame already and I made the stats picture in word and gr

Mod Podge Tile Coasters

Image
I love these coasters. Unfortunately, I don't see us being able to use these in our house anytime soon. O likes to throw things and these would definitely break or break something. So in the mean time, I am planning to make these as my "make and take" at my upcoming Pinterest party and make and give them as gifts. I found this project on Pinterest at The Cottage Home- http://thecottagehome.blogspot.com/2011/01/tile-coaster-tutorial.html Supplies: 4 square tiles  (4 x 4)- I bought my at the Habitat Re-Store. They were .10 each. 4 pieces of scrapbook paper (3.75" x 3.75") 4 pieces of felt (3.75" x 3.75") Mod Podge Sponge brush strong adhesive-  I used Fabri-Tac. Clear acrylic sealer- I used Krylon Crystal Clear. Step 1.  Choose work space and gather supplies. Step 2.  Cut (4) 3 3/4" squares of scrapbook paper. Step 3. Apply your first coat of Mod Podge to a clean tile surface and place piece of pre-cut scrapbooking paper on wet

Mac & Cheese Muffins

Image
This is a new twist on an old FAVORITE. I made these this morning and am so excited to have O try them for lunch. He is a big fan of mac and cheese, who isn't, right?  I found this particular recipe on Pinterest. It's from www.emilybites.com . I made a couple of changes to her recipe, which you will find below. Ingredients: 4 c cooked whole wheat or high fiber macaroni ( I used regular bow tie pasta; it was in the pantry) 1 T butter 1 T flour 1 c skim milk (I used Horizon DHA low fat milk; it was what we had) 1 garlic clove, minced 3 oz sharp cheddar cheese, shredded 3 oz Gruyere cheese, shredded  (I used 3 skinny cow Swiss cheese wheels) 1 egg 1 egg white 1 (10 oz) package of frozen chopped spinach, defrosted, drained and patted dry (or you could use 1 cup cooked fresh spinach) Salt & pepper to taste 

Fun lunch with a muffin tin...

Image
I go back and forth with whether I think O is a good eater or not. There are some meals he eats like it could be his last meal and then there are other meals he barely eats a bite. As a mother this is frustrating. I recently started a Pinterest board called Toddler Taste Buds. Here I pin all sorts of recipe, snack and food presentation ideas, tips and tricks for O. Most recently I decided to add a little fun to our meal time. By fun, I mean trying a new way to present his food. So I went with the Muffin tin approach. Today's lunch was our first attempt. I decided to go with foods I knew he liked and ate well. I made a PBJ, but instead of just cutting it in quarters, I used a heart cookie cutter. I also gave his potato straws, raisins, banana slices and his favorite...2 mini vanilla wafers. As to be expected, he ate the vanilla wafers first, followed by the potato straws. He ate one slice of the bananas. I had to coax him to eat some of the PBJ. In the end, he ended up with a sl

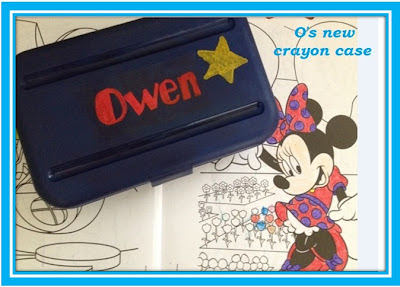
Personalized Crayon box

Image
 I love this time of year because I love school & office supplies. Who would think at 32 years old with no school aged children, not in school or working I would still get so excited. I picked up this great plastic pencil box at Staples for just .50. I bought 2, one blue and one clear. I really should have  bought more for this price. I could have given them as gifts to my nieces and nephews. Below you will see the blue one I personalized for O. We keep his crayons in it. It's the perfect size. Enjoy these last couple of weeks of back to school sales. Be sure to buy more then you need now at these great prices. You won't see these prices mid year when your supplies have run out.